Creating anaglyph images


The basis of this text is taken from:


http://204.57.196.12/ug/foto/anaglyph.html


Requirements


You will need:


  1. A pair of stereo images.
  2. Adobe Photoshop.
  3. 3D glasses with one red and one blue lens. The red lens goes over the left eye.
The Photoshop Process
 
 
  1. Once in Photoshop, open the left and right images. To open a "tiff" file scanned in by a Macintosh, or a PC with a program besides Photoshop, use the open as command under the file menu.

  2.  


    a) Verify that the background is white. To do this check under the color palette, which is on the right side. There are two overlapping boxes, one is white, the other black. Click the white box. You should verify that the colors to the right of the box are light. Now click the black box and verify that it darkens the colors significantly. Finally, click the white box again. You want the background to be light. Otherwise the images will come out reversed.

  3. If the scanned photo appears to be significantly darker than the original, you may lighten the image using the brightness command. To lighten the image, check under: image/adjust/brightness. Be careful when lightening not to delete information from the scan. Too much lightening may eliminate important geologic information. If you do any image adjustments, make sure you do them to both images.
  4. Convert the right image into RGB (red, blue, green) mode under Image/Mode.
  5. Under the channels on the palette on the lower right of the screen click on the word Red such that only the red channel is highlighted. That is, click on the word red and not the dot to the left of the word. If you have any problem doing this, or need to start over, click on RGB, which should select all the channels. When you do this, click RGB and not the dot to the left of RGB, then click the word Red. The end result will be that the red channel under the channel palette will be highlighted and all other channels will be clear.

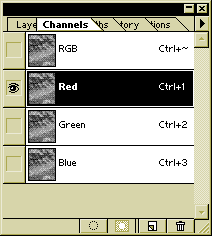
  6. Clicking in the box with the word "Red" selects the red channel.


  7. Click on the right image and use Select/All from the menu. Then use Edit/Cut. This will remove the green and blue information from the right hand image and you will see a blank image on screen. Under the channels palette you will see a red image remains.
  8. Make the left image active. Use Select/All. Then choose Edit/Copy. You can close the left image after using the copy command. The fewer files open, the less time it will take for Photoshop to manipulate the images.
  9. Make the right image active. Select Edit/Paste. The left image is now cyane (which is a combination of green and blue). The right image was made red in steps 3 through 5. By highlighting the red channel on the right image and cutting all the material, you left only a red image. By pasting in the gray tone left image into the right image with the only the right image red channel selected, you effectively made the left images the two remaining colors: blue and green.
  10. In the RGB channel window, select the dot to the left of RGB. This will allow you to see all the channels together and view the anaglyph. However, because Red channel is still highlighted and none of the others are, you will be able to manipulate the cyane image.


  11.  
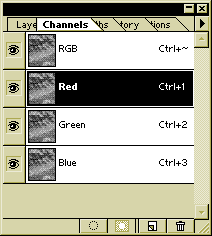
        Clicking on the small box to the left of the "RGB" box makes an eye appear to the left of every channel.  This does not change the selected channel (in this case, red), and will allow you to view the composited RGB image.
         
  12. Align the cyane image with the red image. To do this choose the move tool, which is under the tools palatte. The tools palette is the rectangular palette to the left of the screen. The move tool looks like an arrow and a plus sign and is toward the top right of the tools palette.
  13. To significantly reduce the amount time to manipulate the images by reducing the amount of memory needed by the computer do the following:
  14. Once the red and cyane images are roughly aligned, close all other images but the anaglyph image.
  15. Use the draw rectangle tool and make a box slighly larger than the overlapping cyane and red area.
  16. Select all the color channels by clicking RGB on the channels palette. All colors should now be highlighted on the channels palette.
  17. Use the Select/All command. Then choose Edit/Copy.
  18. Open a new image under File/New. A window will appear with the dimensions, size, and type of file to open. It should be the same as the area just copied. If it doesn’t say RGB then that means that not all the channels were selected. If it does not say RGB, close the new image and go back to step (b). Remember to click RGB and not the dot to the left of RGB.
  19. Select the new image and use Edit/Paste.
  20. You can now close the old anaglyph image without saving it because you have all the necessary information on a new, smaller image.
  21. Flatten the image under Image/Flatten image
  22. Save the anaglyph image as a tiff file: filenamesp.tiff
  23. Copy the thumbnail selection to a new file using the above procedure (a-h) for selecting, making a new file, pasting, and flattening. Remember to select an area slighly larger than the actual thumbnail because you will be moving the right image around slightly. Save the thumbnail as: filenamet1. Save repeated thumbnails as filenamet2, etc.
Note: Manipulating the image to produce an anaglyph will be easier to do if you are only working with the thumbnail. The smaller file will take less time for Photoshop to manipulate. Additionally, errors due to tilting of the photo will be less magnified over the small area of a thumbnail versus the relatively large area of the entire overlapping area.
 
 
  1. To manipulate the cyane image to produce an anaglyph:
  2. Select the red channel under the channels palette. To do this, click RGB, then Red, then the dot to the left of RGB. In this way, you will be able to see the red and cyane image together but be able to move the cyane image.
  3. Use the move tool to line up the cyane image with the red image. They will be lined up when the combined image looks like a gray scale image. Then move the cyane image slighly to the left of the red image.
  4. For photos with significant elevation differences, such as mountains, or gorges, line the images up at the lowest elevation. Our experience has been that, at the lowest elevation, the cyane image should be about 12 pixels to the left of the red image.

  5.  


    -For the cyane image, light parts of the photo, such as roads, will appear red when not lined up with the red image. This is because the red from the right image is showing from beneath the cyane image.

    -Conversely, dark parts of the photo, such as shadows, will appear cyane when not lined up with the red image.

    -Therefore, when lining the cyane image to the left the red image, the roads will appear red and be to the left.

    -Dark parts of the photo will appear blue when moved to the left of the red image.

  6. To get a reading on what a twelve pixel difference is:
i) Line up the cyane image with the red image so that the overlapping of the two images appears to be close to a gray scale photo. Then move the cyane image slightly to the left of the red image.

ii) Select pixels under units and rulers, which can be found in file/preferences.

iii) Check the spacing between the cyane and red image.

-Line up a man made structure such as a road or a field

-Using the draw rectangle tool, measure the distance between the cyane and red image by drawing a box between them. Remember: light images such as roads should will be red and to the left. Dark images such as shadows are blue to the left. If you get confused as to which should be left, line the cyane image up with the red image then move the cyane slightly to the left, this is the correct placement of cyane.

iv) Click under the information palette on the upper right of the screen. This will tell you the size of the area selected. You are shooting for a separation distance between the red and cyane images of about 12 pixels at the lower elevations.

v) You can move the cyane image very precisely by selecting Filter/Offset.

vi) It is very important that you line up both images equally in the horizontal direction. There should be not vertical offset.


Additional information:


To rotate individual channel

  1. Highlight channel to rotate. That is, if you want to rotate the red channel, click on the word red on the channels pallete.
  2. Under the Select menu choose all.
  3. Under edit/transform/numeric
    1. enter angle to rotate image
    2. image is rotated about its center
Make sure depressions such as streams and valleys appear low and hills appear high.